
With the batch processing you can shrink photos quite quickly with various options!1.) ... Downsizing the pictures - options!
|
| (Image-1) Batch processing of photos and reduction options! |
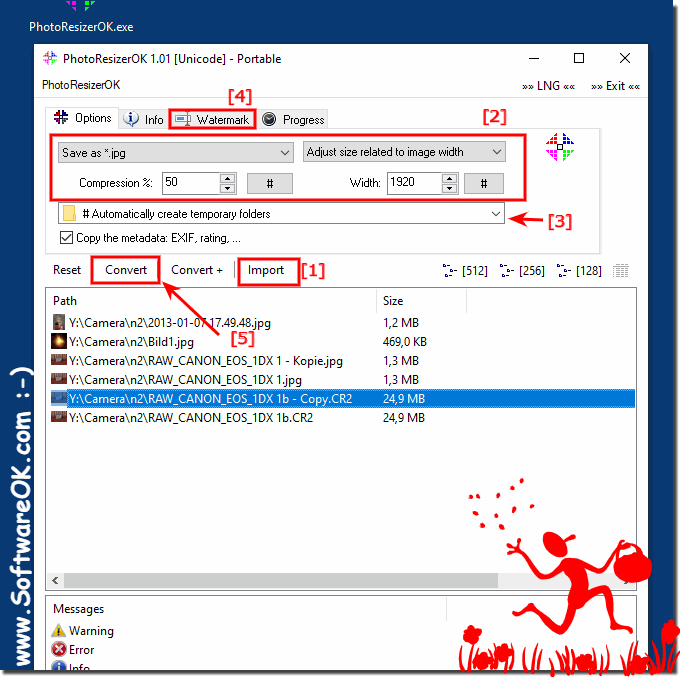 |
The special thing about this program is that there are different settings for image reduction. The desired final size is made by selection. For example, image width 800 means a maximum image width of 800 pixels and the height is automatically calculated as a percentage in pixels, or for example 50% of the original size and the image is reduced by 50%!
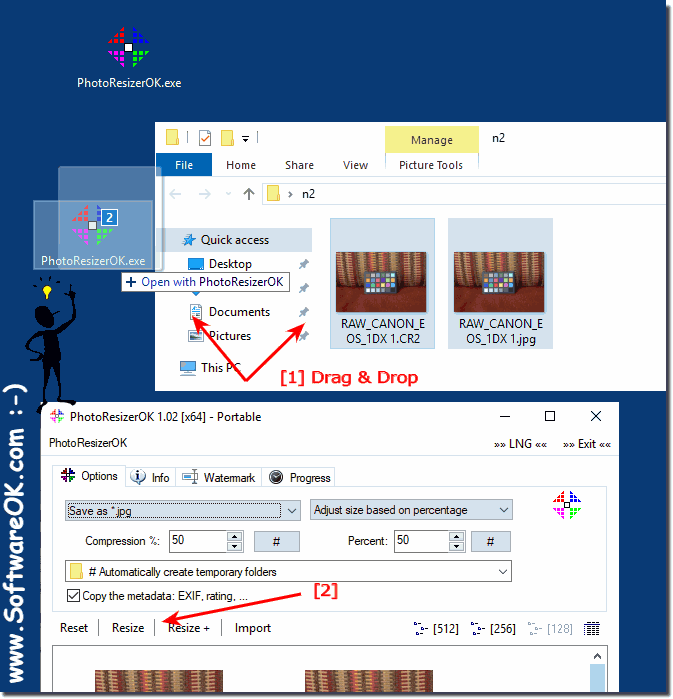
2.) Images can be reduced by drag and drop!
1. After you have downloaded PhotoResizerOK, you can place the image reduction tool on your desktop.
2. And store the images to be reduced on the program
3. And reduce the images using the Convert / Resize button
| (Image-2) Images can be reduced by drag and drop! |
 |
Batch processing of photos and reduction options for: Windows 11, 10 , 8.1, 8, 7: Pro, Home, Enterprise, Basic, Premium, Professional, Starter, Ultimate, Windows-Server 2019, 2016, 2012
3.) Batch processing of photos and reduction options Pros and Cons!
Let's dive into the technical aspects of batch processing photos and the different reduction options:Batch processing photos:
Batch processing, also known as batch processing, makes it possible to edit a large number of photos at the same time. This is particularly useful for photographers who need to capture a variety of images and edit them quickly. Here are some technical considerations:
1. Efficiency:
Batch processing can save you time by not having to edit each photo individually. You can apply a series of editing steps to all photos at once, which is especially helpful for repetitive tasks like applying watermarks or adjusting colors and contrast.
2. Automation:
Batch processing allows high automation by creating actions or scripts that are applied to all photos. This enables consistent editing and reduces human errors.
3. Resource consumption:
When batch processing, it is important to consider the impact on system resources, especially when processing a large number of photos at the same time. This can affect computer performance and result in longer processing times.
Reduction options:
Reducing photos is often necessary to reduce file size, speed up loading times, and ensure compatibility with different platforms and devices. Here are different downsizing options with their pros and cons:
1. Manual Adjustment:
Manual adjustment allows you to individually adjust the size of each photo to ensure it meets your needs. This offers maximum control, but also requires more time and effort.
2. Scale Proportionally:
This option scales the photo proportionally, specifying length or width dimensions. This preserves the aspect ratio of the photo, but the final size may vary depending on whether the photo is in portrait or landscape orientation.
3. Fixed dimensions:
Here you set fixed dimensions for the width and height of the photo. This can be useful for ensuring that all photos are the same size, but may not be ideal if you want to preserve the aspect ratio.
4. Quality parameters:
Many photo editing programs offer the ability to adjust the quality of the photo while reducing it. This can impact file size and image quality. A higher compression rate results in smaller file sizes, but may result in a loss of quality.
Overall, the best downsizing options depend on the specific needs of the project, including the desired final size, quality, and compatibility of the photos. It is important to test different options and choose the one that gives the best results.
FAQ 5: Updated on: 8 April 2024 14:31