Windows 10/11 Snipping Tool is a screenshot capture utility. You can usually just open / find it!
Content:
1.) ... Starting the snipping tool
2.) ... The program directory and the executable file!
3.) ... Tips: Snip on Windows 10/11!
Everyone knows how to take a Windows screenshot. The snipping tool does not have to be installed on Windows 10/11. The snipping tool is the built-in Windows desktop app that allows users to take a screenshot. It is activated automatically when you activate the Windows system without using external screenshot tools!
1.) Starting the snipping tool on windows 11 and 10!
Method-1!1. Go to the W10/11 Start menu
2. Select all apps
3. Select Windows Accessories and tap on Snipping Tool.
Method-2!
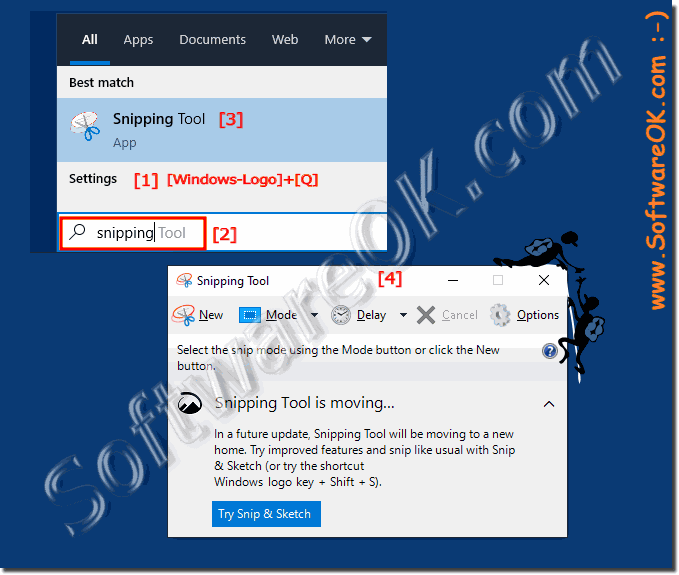
1. Press the Windows key + Q
2. enter "Snipping"
3. and start the screenshot tool
(... see Image-1 Point 1 to 4)
| (Image-1) Find Snipping Tool on Windows 10! |
 |
PS:
The snipping tool has been part of Windows for a long time. This tool was first included in Windows 2005 and, apart from a few bug fixes, has not received any new functions. The snipping tool can take screenshots of an open window, a rectangular area, a free-form area, or the entire screen. You can add different colored pens or a highlighter to your snips, save them as an image or MHTML file, or send them to a friend by email.
The snipping tool has been part of Windows for a long time. This tool was first included in Windows 2005 and, apart from a few bug fixes, has not received any new functions. The snipping tool can take screenshots of an open window, a rectangular area, a free-form area, or the entire screen. You can add different colored pens or a highlighter to your snips, save them as an image or MHTML file, or send them to a friend by email.
2.) The program directory and the executable file ON Windows 11/10!
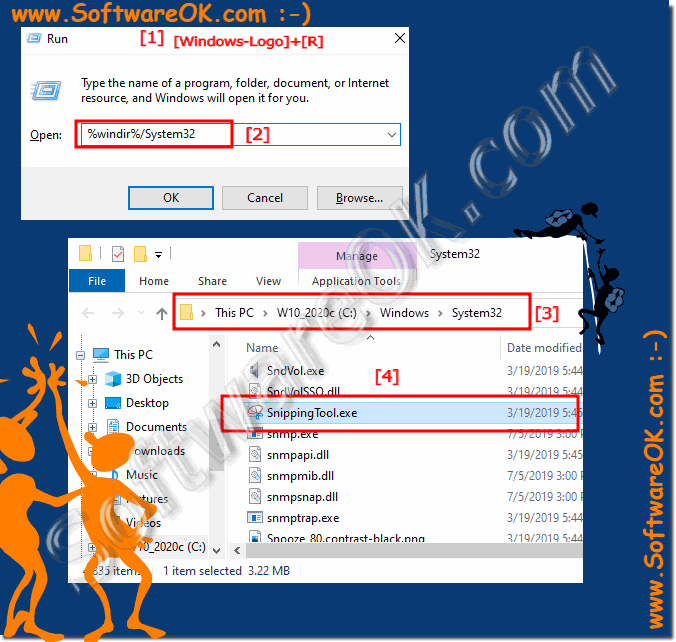
The folder "%windir%/System32" contains the helpful screenshot tool like so many other classic Windows 10 / 11 tools.(... see Image-2 Point 1 to 4)
| (Image-2) Find Snipping Tool on Windows 10 in System32 Folder! |
 |
3. Tips: Snip on Windows 10 / 11!
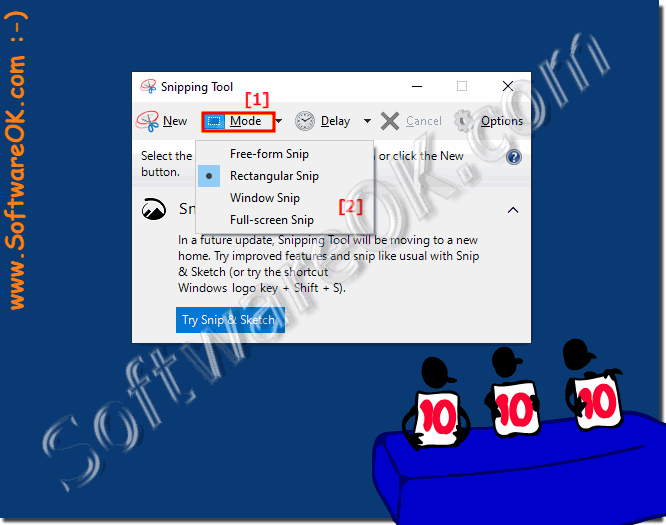
After opening the snipping tool, you can click on the icon behind the New> "Mode" option and then open the drop-down menu: Free cut, Rectangular cut, Window cut, or Full screen snip (cut). You can select what you want and then click the New button. You can then use the mouse to select the area in which you want to take a screenshot.| (Image-3) Use the MS Snipping Tool on Windows all OS! |
 |
Info:
Use the paint program that comes with Windows to edit the picture you just took. To start Paint, click the Start button and choose Programs or All Programs. Choose Accessories and then Paint. To move the captured image in Paint, go to the Edit menu and select Paste. At this point you can print, change or save the image. You can also insert this image into any other program that processes images (e.g. Microsoft Word or Excel).
