
In the screenshot function you can save directly as JPG, PNG, BMP, GIF or TIFF with the [s] key and use on all Windows 11, 10, ...!Content: 1.) ... Activate the screenshot function in Desktop-OK!
|
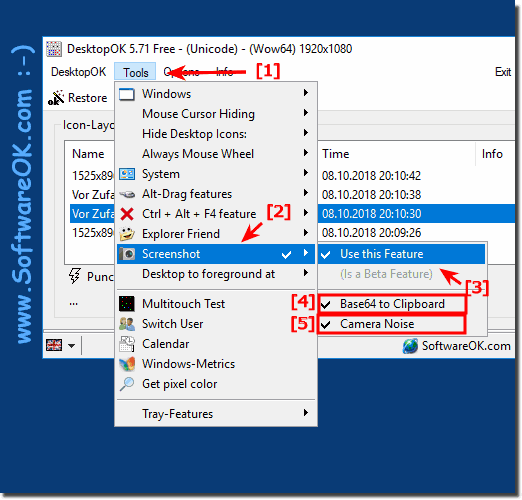
| (Image-1) Activate the Screenshot Feature! |
 |
2.) Using the screenshot function + save as a file!
Start creating a screenshot by pressing the Print key on the Windows keyboard or, if activated, by clicking on the camera symbol in the info area.1. Press the left mouse button and keep it pressed.
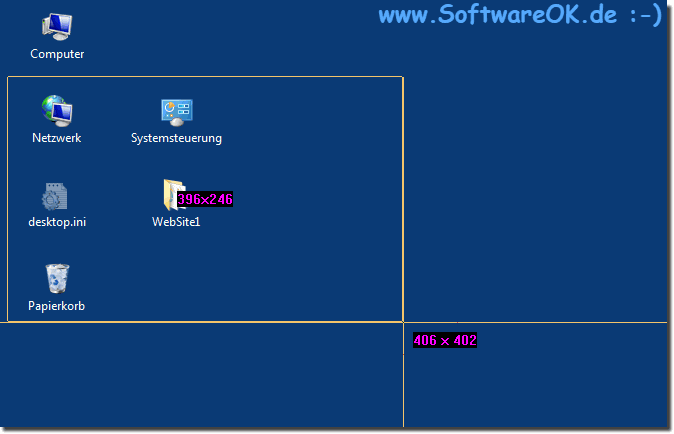
2. Mark the area on the screen, the size in pixels of the selected area is automatically displayed. ( ... see Image-2 )
3. When you have finished marking, release the left mouse button.
Optionally, before releasing the left mouse button, you can:
a.) Press the [S] key to switch to saving directly as a file: GIF, TIFF, PNG, BMP, JPG dialog
b.) Press the [P] key to open the image in MS Paint to edit it.
PS: Optionally, if you do not select anything, a full-screen recording of the desktop is made and stored in the clipboard with a simple mouse click in the same place.
This screenshot tool is an easy-to-use program for saving images of your screen. It doesn't include customizable hotkeys, however, but the ability to include a single window, custom area, or full screen mode. After selecting the area by pressing the [S] key, it can optionally be saved as JPG, PNG, BMP, GIF or TIF in order to then insert it into a graphics application of your choice.

PS: Optionally, if you do not select anything, a full-screen recording of the desktop is made and stored in the clipboard with a simple mouse click in the same place.
| (Image-2) Screenshot function in desktop OK! |
 |
This screenshot tool is an easy-to-use program for saving images of your screen. It doesn't include customizable hotkeys, however, but the ability to include a single window, custom area, or full screen mode. After selecting the area by pressing the [S] key, it can optionally be saved as JPG, PNG, BMP, GIF or TIF in order to then insert it into a graphics application of your choice.
3.)
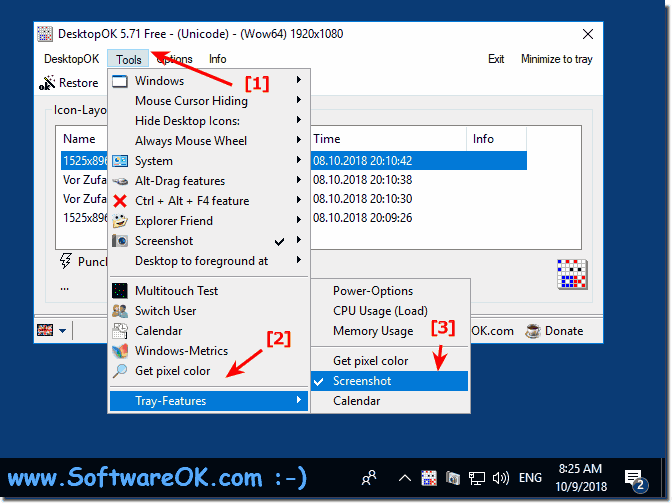
Activate the screenshot from the info area!As of version 5.71, you can start the screenshot from the notification area of the Windows taskbar, by clicking on the symbol in the taskbar on the right or left, the creation or marking of the screenshot area is started.
1. Activate the screenshot from the function info area ( ... see Image-3 Point 1 to 3 )
3. Click on the symbol in the MS Windows task bar to create the screenshot.
( ... see Image-3 Point 4 )
►► ... back to DesktopOK !
| (Image-3) Screenshot Function from Notification Area! |
 |
4.) Who needs another screenshot function on Windows please?
That's a legitimate question! In fact, Windows already offers a built-in screenshot function via the "PrtScn" (Print Screen) or "Alt + PrtScn" key combinations to capture the entire screen or just the active window. So why use another screenshot feature?
Here are some possible reasons:
1. Additional features:
Some third-party screenshot tools offer advanced features beyond the built-in Windows options. These include, for example, the ability to select specific screen areas, add annotations or upload directly to the cloud.
2. User Preferences:
Some users may prefer the interface or functionality of certain third-party tools compared to standard Windows options.
3. Special Requirements:
Certain tasks or workflows may require specialized screenshot tools that offer specific features or integrations not available in Windows.
4. Easier to use:
Some users may find third-party screenshot tools more intuitive or easier to use than the built-in Windows options.
Ultimately, the need for additional screenshot functionality depends on the user's individual needs and preferences. While the built-in Windows options may be enough for many users, third-party tools can provide additional value depending on specific needs and preferences.
5.) Top questions with the corresponding answers to screenshots Windows!
1. How to enable the screenshot feature in DesktopOK?- Start DesktopOK as usual to enable the screenshot feature.
2. Which option allows saving screenshots in Base64 encoded form?
- DesktopOK offers a Base64 option to save screenshots in Base64 encoded form.
3. Which mouse button do I have to press to mark an area of the screen?
- Press and hold the left mouse button to highlight an area of the screen.
4. How to open the selected image in MS Paint for editing?
- By pressing the [P] key, you open the selected image in MS Paint for editing.
5. Can the screenshot function also be accessed via the info icon in the Windows taskbar?
- Yes, DesktopOK allows you to access the screenshot function via the info icon in the Windows taskbar.
6. Which formats can be saved directly by pressing the [S] key?
- By pressing the [S] key, screenshots can be saved directly as GIF, TIFF, PNG, BMP or JPG.
7. What is the function of the optional camera sound in DesktopOK?
- The optional camera sound in DesktopOK serves as an audible confirmation when saving screenshots.
8. From which version can you start the screenshot directly from the info area of the Windows taskbar?
- From version 5.71 you can start the screenshot directly from the info area of the Windows taskbar.
9. What are possible reasons for using an additional screenshot feature on Windows?
- Some reasons could be advanced features, user preferences, special requirements, or ease of use.
10. What keyboard shortcuts does Windows offer for the built-in screenshot feature?
- Windows offers the keyboard shortcuts "PrtScn" (Print) or "Alt + PrtScn" for the integrated screenshot function.
11. What advanced features do some third-party screenshot tools offer?
- Some advanced features include adding annotations or direct cloud integration.
12. Why might some users prefer the interface of certain third-party tools?
- Some users might find the interface of certain third-party tools to be more intuitive or functional.
13. What special requirements might require the use of specialized screenshot tools?
- Special requirements may require certain features or integrations that are not available in the built-in Windows options.
14. What option does DesktopOK offer for quick access via the notification area icon in the Windows taskbar?
- DesktopOK offers the possibility to quickly access the screen via the notification area icon in the Windows taskbarshot function.
15. Can DesktopOK also record custom screen areas?
- Yes, DesktopOK allows you to capture custom screen areas.
16. What are the ways to save a screenshot in DesktopOK?
- You can directly save a screenshot as a file or copy it to the clipboard.
17. What are the benefits of DesktopOK's Base64 option for webmasters and users of online services?
- The Base64 option allows screenshots to be saved in Base64 encoded form, which can be useful for webmasters and online service users to easily share or embed images.
18. Why might some users find third-party screenshot tools more intuitive than the built-in Windows options?
- Some users might find third-party screenshot tools more intuitive, as they may have a more user-friendly interface or offer specific features that better suit the needs.
19. What additional features does DesktopOK offer compared to the standard Windows options?
- DesktopOK offers additional features such as the ability to capture custom screen areas and save screenshots in different formats.
20. How to enable camera sound in DesktopOK?
- The camera sound in DesktopOK can be enabled in the settings.
21. Which version of DesktopOK allows you to take a screenshot directly from the notification area of the Windows taskbar?
- Version 5.71 of DesktopOK allows you to start the screenshot directly from the info area of the Windows taskbar.
22. What are the steps required to enable the screenshot from the notification area?
- To enable the screenshot from the notification area, you must enable the corresponding function in the DesktopOK settings.
23. Why might it be important for webmasters to save screenshots in Base64 encoded form?
- Saving screenshots in Base64 encoded form makes it easy to share or embed images on websites and online services.
24. Can you record the entire screen with DesktopOK?
- Yes, DesktopOK can also record the entire screen.
25. What option does DesktopOK offer for saving a screenshot as a file?
- DesktopOK offers the option to save a screenshot directly as a file or copy it to the clipboard.
26. How to mark a custom area in DesktopOK?
- You can highlight a custom area by pressing and holding the left mouse button while selecting the screen area.
**27. What are the advantages of being able to record a camera sound when storing To enable screenshots?
27. What are the advantages of being able to activate a camera sound when saving screenshots?
- The camera sound provides an audible confirmation and increases security as the user immediately knows that the screenshot has been saved successfully.
28. Is it possible to configure DesktopOK to start automatically at system startup?
- Yes, DesktopOK can be configured to start automatically at system startup for seamless use.
29. Why might some users appreciate the ability to save screenshots directly to different file formats?
- The ability to save screenshots directly to different file formats provides flexibility and adapts to the different needs and preferences of users.
30. What additional features does DesktopOK offer for using screenshots?
- DesktopOK allows you to mark up custom screen areas, add Base64-encoded screenshots, and offers the option to enable a camera sound.
31. Can I use DesktopOK without installation?
- Yes, DesktopOK offers a portable version that can be used without installation, which is especially useful if you don't have administrator privileges or if you want to use it on different devices.
32. How do I set up DesktopOK to be accessible from the notification area icon in the Windows taskbar?
- DesktopOK can be set to be accessible from the notification area icon in the Windows taskbar by enabling the appropriate option in Settings.
33. Why might it be necessary to use specialized screenshot tools for certain workflows?
- Specialized screenshot tools often offer advanced features or integrations that are essential for specific workflows or specific needs that are not covered by Windows' standard screenshot options.
FAQ 45: Updated on: 28 May 2024 19:16