
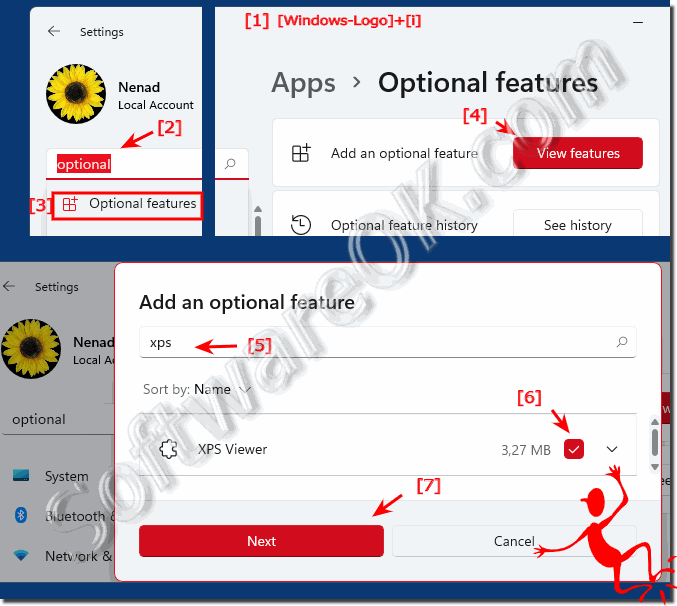
If you find that the XPS viewer is missing in MS Windows 11, don't panic, installing the optional XPS viewer is easy!Contents: 1.) ... Install the solution to the Windows 11 XPS Viewer!
|
| (Image-1) Install XPS viewer in Windows 11! |
 |
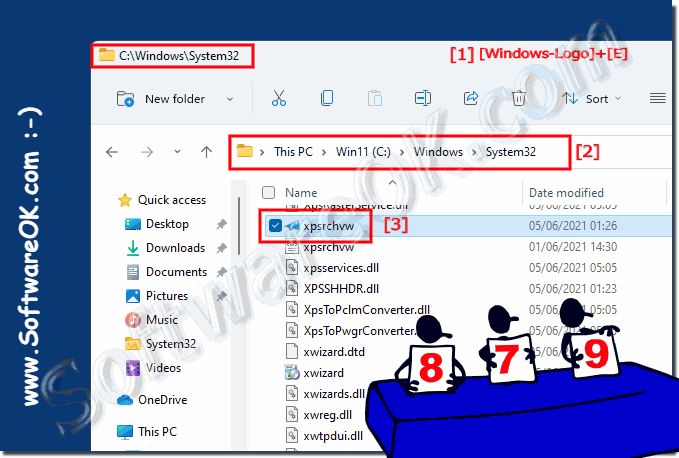
2.) The folder / directory / path to the XPS document viewer!
After: ► have successfully installed the Windows 11 XPS Viewer1. Start the MS File Explorer and Windows Logo + E
2: Open the directory: C: \ Windows \ System32
3. Scroll down to xpsrchvw.exe
The full file path is therefore: C:\Windows\System32\xpsrchvw.exe
The XPS documents are saved in My Documents / Documents.
See: ►►► Find My Documents folder in Windows 10 and 11 from all users
| (Image-2) The XPS viewer full path on Windows 11! |
 |
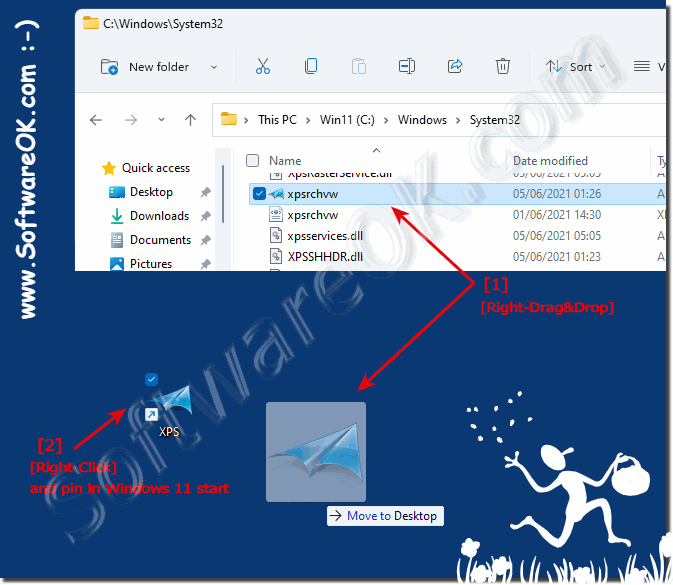
3.) Desktop shortcut for the XPS document viewer on Windows 11!
After you have opened the program path of the XPS viewer, it is easy to create a desktop shortcut
by dragging and dropping ( Please use the right mouse button)
(... see Image-3 Point 1 and 2)
Info:
You can then make it available in Windows 11 start by simply right-clicking on the desktop shortcut you just created for the XPS document viewer! In Windows 11/10 and XPS Viewer is disabled by default, but you can enable it from Control Panel if you need it.
You can then make it available in Windows 11 start by simply right-clicking on the desktop shortcut you just created for the XPS document viewer! In Windows 11/10 and XPS Viewer is disabled by default, but you can enable it from Control Panel if you need it.
| (Image-3) XPS viewer Desktop Shortcut on Windows 11! |
 |
4.) Is the XPS document viewer still useful on Windows 11?
The XPS Document Viewer is a program developed by Microsoft for viewing XPS (XML Paper Specification) files, a file format for viewing electronic documents. XPS was Microsoft's answer to the widely used PDF format. However, the PDF format has established itself as the standard for exchanging electronic documents, and XPS has never achieved the same level of adoption.In Windows 11, the XPS document viewer is still available by default, but is used less frequently than PDF viewers and other document viewing applications. Whether it makes sense for you depends on your specific purpose. If you regularly work with XPS files or receive XPS files from others, the XPS Document Viewer may be helpful. Otherwise, there are probably better and widely used options for viewing and editing documents, such as: B. Adobe Acrobat Reader for PDF files.
Overall, the usefulness of the XPS document viewer in Windows 11 depends on your individual needs and the file formats you use. There are many other options for viewing and managing documents that may better fit your workflow.
Here are other different factors as to whether the XPS Document Viewer on Windows 11 still makes sense for you:
1. Using XPS Documents:
If you regularly work with or receive XPS documents, the XPS Document Viewer can still be useful. It allows you to open and view XPS files without additional software.
2. Alternative Viewer:
Windows 11 ships with the Microsoft Edge browser by default, which can also view XPS documents. If you already use the Edge browser and only need to open XPS documents occasionally, this may be enough to avoid the need for a separate viewer.
3. Preferences and Requirements:
The decision for or against the XPS Document Viewer also depends on your personal preferences and work requirements. If you need a special viewer with advanced features or prefer alternative software that also supports other file formats, you can choose another viewer.
5.) Why isn't XPS supported much more by MS, it could replace PDF!
Microsoft's decision to no longer actively promote or further develop the XPS document viewer may have several reasons:1. Spread and acceptance:
The PDF format has established itself as a widely used and accepted standard format for exchanging documents. In comparison, distribution of XPS documents is more limited, potentially reducing the need to develop or promote a dedicated viewer for them.
2. Competition:
There are already a variety of established third-party PDF viewers and editors that offer a wide range of features. Microsoft may find that it is more efficient to reference or collaborate with these existing solutions than to invest in further development of the XPS document viewer.
3. Priorities:
Microsoft may focus on other technologies and products that are more strategically important or have a larger user base. The company's resources are allocated according to current priorities and goals.
4. Compatibility and Interoperability:
PDF offers high compatibility and interoperability across different platforms and software. Promoting PDF as a standard format enables seamless collaboration between users, regardless of the devices or applications they use.
Info:
Although the XPS document viewer theoretically has the potential to replace PDFs, many factors play a role in the acceptance and distribution of a file format and its associated viewer software. Microsoft's decision to potentially stop promoting the XPS document viewer likely reflects these realities and priorities.
Although the XPS document viewer theoretically has the potential to replace PDFs, many factors play a role in the acceptance and distribution of a file format and its associated viewer software. Microsoft's decision to potentially stop promoting the XPS document viewer likely reflects these realities and priorities.
FAQ 99: Updated on: 19 April 2024 11:46