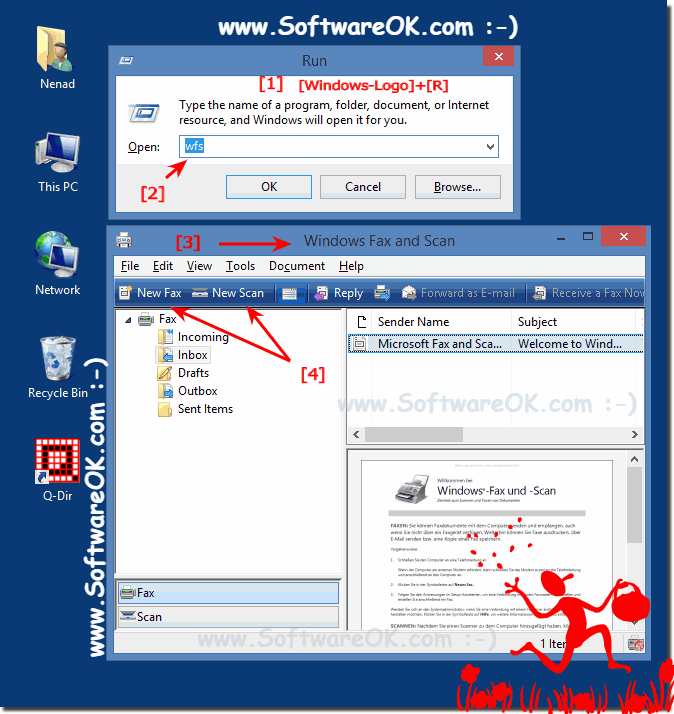
To open (start, find) Windows-8 Fax and Scan to scan and fax the documents, please press the key combination [Win-Logo]+[R], then simply enter the command wfs
To create a shortcut for scanner on windows 8 Desktop:
use also the cmd (command) wfs:
Click on a free area on the win 8, 8.1 or win 7 desktop. In the context menu select (click) "New", "Shortcut" and enter: wfs, and [ENTER]
PS: If you have a scanner, you can use Windows Fax and Scan to scan documents and photos. Youll have to install your scanner before you can start. Connect it to your PC, plug it in, and turn it on.
Tip: Default Fax Folder in Windows 8.1/8 is: shell:UsersFilesFolder\Documents\Fax
When you use Windows Fax and Scan, your scanned documents and photos get stored in the documents folder under Scanned Documents. If you choose a different scan app, like the one that came with your scanner, that app will probably let you choose a folder for your scanned documents and photos.
Notes:
You can crop an image before you scan it. Just drag the handles of the cropping tool to resize it.
If you have trouble previewing your scan, clear the check box next to Preview or scan images as separate files
For details what your specific scanner can do, check your scanner manual or the manufacturers website.
If you dont have a stand-alone fax machine, you can use Windows Fax and Scan to send and receive faxes. You can explore Windows Fax and Scan to find out how to do things like save, forward, and organize your faxes and customize cover letters. Here are a few steps to get you started.Note:
With Windows Fax and Scan you can fax electronic copies of your documents and photos.
If you have only hard copies, youll have to scan them first. For info about scanning, see -Get started with scanning-.
Set up your PC to send and receive faxes. Before you can send and receive faxes, youll need a fax modemeither internal or external/and an analog phone line.
If youre faxing from a network, youll need the address of your fax server.
Before you can start the scan, please connect your scanner to your PC, plug it in, and turn it on. And install your scanner driver!
Scanners and Cameras in Control Panel enables you to install scanners, digital still cameras, digital video cameras, and other image-capturing devices.
After a device is installed, you can use the Scanners and Cameras Wizard to download and save pictures on your computer in a folder you specify. You can also view device properties, delete pictures from your camera, or print photos. You can even test your device to make sure everything is working properly.
You can use Scanners and Cameras to link your device to a program on your computer. For example, you can set your computer to automatically open all of your scanned pictures in your program of choice.
Windows automatically saves pictures to the My Pictures folder or to a subfolder you specify. If you save your files to any My Pictures subfolder or any folder customized as a pictures folder, Windows provides specialized tools and features you can use such as Windows Picture and Fax Viewer and the ability to view your pictures as a slideshow.
Many cameras and scanners are Plug and Play. Windows detects Plug and Play devices after you plug them into your computer. Some devices automatically shut themselves off after a period of time. If your camera is connected to your computer, and it is not being detected, check to see that it is turned on.
2.) Further tips for fax, scanning and Co. on MS Windows!
Windows-8 Fax provides comprehensive fax functions on the computer. You can configure Win-8 fax settings, send and receive faxes, track and monitor fax activity, and access archived faxes. Fax allows you to send and receive faxes using either a local fax machine attached to your computer or a remote fax machine connected to fax resources on a network.
Download the Windows 8 and Windows 8.1 Enterprise to try for free Windows 8 / 8.1 Enterprise version is Windows 8 Pro with additional features Content:
To activate Windows 8 or 8.1 via phone system Please start the Win-8 cmd.exe in administrative mode. Use this solution also for Windows Server 2008 and 2012
To zoom view in start or apps screen in Windows-8 and Win 8.1 Please use the key combination [Ctrl]+[+] for zoom In and [Ctrl]+[-] for zoom Out. In the Windows-8
The Windows 8 / 8.1 calc is one of the necessary tools in Windows It´s easy to find and start the calculator in Windows 8 and Windows-8.1 Please press the
This website does not store personal data. However, third-party providers are used to display ads, which are managed by Google and comply with the IAB Transparency and Consent Framework (IAB-TCF). The CMP ID is 300 and can be individually customized at the bottom of the page. more Infos & Privacy Policy ....